FastQ-Screen
Detecting contamination in NGS data and multi-species analysis
![]()

![]()
![]()

Introduction
FastQ Screen is a simple application which allows you to search a large sequence dataset against a panel of different genomes to determine from where the sequences in your data originate. It was built as a QC check for sequencing pipelines but may also be useful to characterise metagenomic samples. When running a sequencing pipeline it is useful to know that your sequencing runs contain the types of sequence they’re supposed to. Your search libraries might contain the genomes of all of the organisms you work on, along with PhiX, Vectors or other contaminants commonly seen in sequencing experiments.
Although the program wasn’t built with any particular technology in mind it is probably only really suitable for processing short reads due to the use of either Bowtie, Bowtie2 or BWA as the searching application.
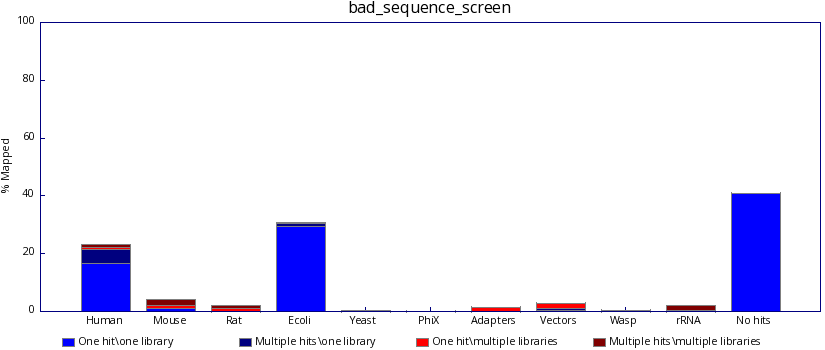
The program generates both text and graphical output to inform you what proportion of your library was able to map, either uniquely or to more than one location, against each of your specified reference genomes. The user should therefore be able to identify a clean sequencing experiment in which the overwhelming majority of reads are probably derived from a single genomic origin.
(Please note, in version 0.9.4 the graphs colour scheme changed from that shown below to a similar, but colour-blind safe colour scheme.)
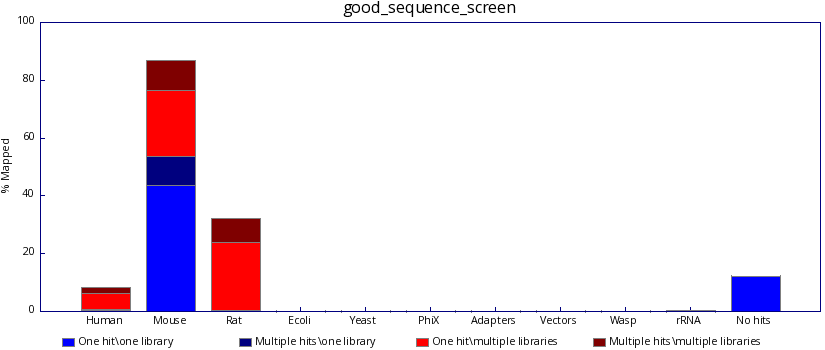
In contrast, poor sequencing results will include results from one or more unexpected species. Identifying such reads may help the user discover the source of the contamination.
Publication and how to cite FastQ Screen
FastQ Screen was published in the open access journal F1000Research.
FastQ Screen should be cited as follows:
Wingett SW and Andrews S. FastQ Screen: A tool for multi-genome mapping and quality control [version 2; referees: 4 approved]. F1000Research 2018, 7:1338 (https://doi.org/10.12688/f1000research.15931.2)
FastQ Screen online tutorials
To assist your understanding of FastQ Screen and how it should be used, we have prepared a series of short training videos.
Training video 1: Introduction to FastQ Screen
Training video 2: Downloading, configuring and running FastQ Screen

Training video 3: Interpreting FastQ Screen results

Training video 4: Filtering FASTQ files

We recommend watching these before using FastQ Screen for the first time. In total the videos take no longer than 20 minutes to watch, and should could cover everything you need to get started with the software.
Project Homepage
The FastQ Screen Homepage can be found here.
Download
FastQ Screen may be obtained from the GitHub download page.
Requirements summary
- Requirements: Linux-based operating system
- Language: Perl
- Bowtie, Bowtie2 or BWA
- gzip (optional)
- SAMtools (optional)
- GD::Graph (optional)
- Bismark (bisulfite mapping only)
Installation
Before running FastQ Screen there are a few prerequisites that will need to be installed:
-
A sequence aligner. FastQ Screen is compatible with Bowtie, Bowtie2 or BWA. It’s easier if you put the chosen aligner in your path, but if not you can configure its location in the config file.
-
We recommend running FastQ Screen in a Linux system, on which the programming language Perl should already be installed.
-
GD::Graph FastQ Screen uses the GD::Graph module to draw PNG format graphs summarising the mapping results. FastQ Screen will still produce both text and HTML format summaries of the results if GD::Graph is not installed.
You can use the built in CPAN shell to install this module:
perl -MCPAN -e "install GD"
Because GD graph uses GD this will be brought in as a dependency. GD may be easier to install using a package manager on many linux distributions. On Fedora for example you can install GD using:
yum install perl-GD
..before doing the CPAN install of GD::Graph
Actually installing Fastq Screen is very simple. Download the tar.gz distribution file and then do:
tar -xzf fastq_screen_v0.x.x.tar.gz
You will see a folder called fastq_screen_v0.x.x has been created and the program is inside that. You can add the program to your path either by linking the program into: /usr/local/bin or by adding the program installation directory to your search path.
Bioconda
Alternatively, FastQ Screen may be installed via Bioconda. Please note that we do not manage FastQ Screen on Bioconda, so please direct any questions regarding this setup to the relevant Bioconda developers. Many thanks to those developers for making our tool available via this platform.
Configuration
In order to use FastQ Screen you will need to configure some genome databases for the program to search. This will involve downloading the sequences for the databases in FASTA format and then using either Bowtie, Bowtie2 or BWA to build the relevant index files. Please note: the aligner used to build the index files must be used to map the reads
Once you have built your index you can configure the FastQ Screen program. You do this by editing the fastq_screen.conf.example file which is distributed with the program. This shows an example set of database configurations which you will need to change to reflect the actual databases you have set up. FastQ Screen can process up to a maximum of 32 reference genomes. Rename the file to fastq_screen.conf after you have finished editing.
The other options you can set in the config file are the location of the aligner binary (if it’s not in your path),and the number of threads you want to allocate to the aligner when performing your screen. The number of threads will be the number of CPU cores the code will run on so you shouldn’t set this value higher than the number of physical cores you have in your machine. The more threads you can allow the faster the searching part of the screen will run.
An example command is shown below. This would process two FASTQ files and would create the screen output in the same directory as the original files.
fastq_screen sample1.fastq sample2.fastq
By default the program looks for a configuration file named “fastq_screen.conf” in the folder where the FastQ Screen script it is located. If you wish to specify a different configuration file, which may be placed in different folder, then use the –conf option:
fastq_screen --conf /home/myConfig.conf sample1.fastq sample2.fastq
Full documentation for the FastQ Screen options can be obtained by running:
fastq_screen --help
Obtaining reference genomes
The sequence aligners Bowtie, Bowtie2 and BWA require reference genomes against which to map FASTQ reads. If you do not have these genomes already in place on your system, you can build them by downloading genome sequence FASTA files from a public database (such as those made available at the NCBI website). Then, simply create genome indices from the FASTA files as detailed in the instructions for your chosen aligner.
Alternatively, pre-built Bowtie2 indices of commonly used genomes may be downloaded directly from the Babraham Bioinformatics website with the command:
fastq_screen --get_genomes
The genome indices will be downloaded to a folder named “FastQ_Screen_Genomes” in your current working directory (or to another location if –outdir is specified). In addition to the genome indices, the folder FastQ_Screen_Genomes will contain a configuration file named “fastq_screen.conf”, which is ready to use and lists the correct paths to the newly downloaded reference genomes. This configuration file can be passed to fastq_screen with the –conf command, or may be used as the default configuration by copying the file to the folder containing the fastq_screen script.
Test Dataset
To confirm FastQ Screen functions correctly on your system please download the Test Dataset. The file ‘fastq_screen_test_dataset.fastq.gz’ contains reads in Sanger FASTQ format.
1. Extract the tar archive before processing:
tar xvzf fastq_screen_test_dataset.tar.gz
-
If not present already, create index files of recent versions of the Mouse and Human genomes (how the index files are generated will depend on the aligner used for the mapping i.e. refer to either the Bowtie, Bowtie2 or BWA documentation for further details).
-
Create a configuration file tailored to your system.
-
Run FastQ Screen
Interpreting the results from a large number of datasets
FastQ Screen output is compatible with MultiQC, a specialist tool for aggregating results from bioinformatics analyses across many samples into a single report. We recommend using this tool for quickly interpreting the FastQ Screen results from a large number of datasets.
Screening Bisulfite Samples
Mapping bisulfite converted sequences is possible with FastQ Screen, which uses the tool Bismark to process the FASTQ files. After downloading and setting-up Bismark, provide the path to Bismark in the configuration file and run FastQ Screen in bisulfite mode.
fastq_screen --bisulfite sample3.fastq
FastQ Screen, when run in Bisulfite mode, reports to which strand the reads aligned (original top strand, complementary to original top strand, complementary to original bottom strand, or original bottom strand). Refer to the Bismark documentation for more details on these bisulfite strand definitions.
A bisulfite test dataset may be obtained from here.
Filtering FastQ Files
You may want to filter your data to remove reads mapping to a certain species. With FastQ Screen it is possible to generate a new FASTQ file in which each FASTQ read is tagged, listing to which genomes the read did, or did not align. This file may then be processed as required to select for, or filter out, reads aligning to given species. By default, selecting –tag will result in the whole file being processed, unless over-ridden by the –subset option.
To create a tagged FASTQ file, enter on the command line something similar to that below:
fastq_screen --tag sample4.fastq
To filter the tag file, enter on the command line something similar to that below:
fastq_screen --filter 1000 sample5.fastq
This instructs FastQ Screen to extract from the FASTQ file reads that map uniquely to genome 1, but not to genomes 2, 3 or 4 (genome order set by the ordered entered in the configuration file). See the table in the FastQ Screen Option Summmary for further details of the –filter options.
It is also possible to tag and filter a file in a single operation:
fastq_screen --tag --filter 0001 sample6.fastq
In this example the file is tagged and reads mapping to a single location on genome 4, but do not align to any of the other three genomes, are written to the output file.
Adjust the filter options as required:
fastq_screen --tag --filter 5555 --pass 1 sample7.fastq
The –pass command allows the user to specify how many filters need to be passed for a read to be written to the output file. By default, all the filters should be passed. Consequently the example above will remove reads that map uniquely to any of the genomes.
Another useful option is –inverse. This option inverts the –filter results i.e. reads that pass the –filter parameter will not pass when –filter –inverse are specified together, and vice versa.
It is also possible to extract reads mapping to none of the reference genomes with the option –nohits:
fastq_screen --nohits sample7.fastq
The option –nohits is equivalent to –tag –filter 0000 (zero for every genome screened).
By adjusting the filters and, if necessary, undergoing several rounds of filtering it should be possible for a user to extract the desired reads.
Filtering paired-end reads files separately will generate files with un-paired reads e.g. a read may be present in File1, but its corresponding pair may not be found in File2. Also, the order of the reads in processed files may not correspond to on another. Consequently, the resulting file pairs will need processing after filtering with FastQ Screen. Several tools are available (although not currently produced by us) to achieve this re-pairing.
There may also may be occasions when, after filtering a FASTQ file, the tags need to be removed from the headers of each read. This can be achieved using the script Misc/remove_tags.pl.
A video tutorial explaining how to filter FASTQ files may be found here.
Performance
The memory requirements and the time taken to process a dataset will vary substantially depending on the input and user settings. The table below summarises the results of mapping two different FASTQ files against a panel of genomes (H. sapiens, M. musculus, R. norvegicus, E. coli, D. melanogaster, C. elegans. A. thaliana, S. cerevisiae, PhiX174, sequencing adapters, commonly used vectors, rRNA, mitochondria, lambda phage). The table below summarises the results.
The table below summarises the time taken to process large and small FASTQ files (output from HiSeq and MiSeq sequencers respectively). Both FASTQ files, which were derived from sequencing human samples, were processed using 14 threads on a 256 node compute cluster, running CentOS v6.2 and using Bowtie2 v2.3.2 as the aligner.
| Classification | File A | File B |
|---|---|---|
| Number of reads | 7,535,739 | 250,033,919 |
| QC Mode Wallclock time | 00:02:03 | 00:17:15 |
| QC Mode System time | 00:01:14 | 00:02:29 |
| QC Mode CPU time | 00:06:48 | 00:30:22 |
| QC Mode Maximum memory (GB) | 4.620 | 4.621 |
| Filter Mode Wallclock time | 00:36:48 | 15:09:58 |
| Filter Mode System time | 00:38:34 | 1:03:03:32 |
| Filter Mode CPU time | 05:11:01 | 4:06:56:22 |
| Filter Mode Maximum memory (GB) | 4.733 | 12.037 |
Many factors will determine the memory requirements of FASTQ Screen and the time taken to process a file. Listed below are the most important factors to consider:
- System processor, memory and other jobs being processed simultaneously
- Number of threads
- Number of genomes to screen
- Number of reads to process
- Whether FastQ Screen subsets the data prior to processing. Typically, for QC reports, a file is subset to 100,000 reads prior to mapping. When filtering files, subsetting is typically not performed.
- Bisulfite libraries take considerably longer to process
While it is not possible to cover every scenario, as a general rule using FastQ Screen to QC a dataset should take minutes whereas filtering a large dataset may take a several hours.
FastQ Screen Options Summary
add_genome <text> : Edits the file ‘fastq_screen.conf’ (in the folder where this script is saved) to add a new genome. Specify the additional genome as a comma separated list: ‘Database name’,’Genome path and basename’,’Notes’
aligner <func> : Specify the aligner to use for the mapping. Valid arguments are ‘bowtie’, bowtie2’ (default), ‘bwa’ or ‘minimap2’. Bowtie maps with parameters -k 2, Bowtie 2 with parameters -k 2 –very-fast-local, BWA with mem -a and minimap2 uses default settings. Local aligners such as BWA or Bowtie2 will be better at detecting the origin of chimeric reads.
bisulfite : Process bisulfite libraries. Bismark runs in non-directional mode. The path to the bisulfite aligner (Bismark) may be specified in the configuration file. Either conventional or bisulfite libraries may be processed, but not both simultaneously. The –bisulfite option cannot be used in conjunction with –bwa.
bismark <text> : Specify extra parameters to be passed to Bismark. These parameters should be quoted to clearly delimit Bismark parameters from FastQ Screen parameters.
bowtie <text> : Specify extra parameters to be passed to Bowtie. These parameters should be quoted to clearly delimit bowtie parameters from FastQ Screen parameters. You should not try to use this option to override the normal search or reporting options for bowtie which are set automatically but it might be useful to allow reads to be trimmed before alignment etc.
bowtie2 <text> : Specify extra parameters to be passed to Bowtie 2. These parameters should be quoted to clearly delimit Bowtie 2 parameters from FastQ Screen parameters. You should not try to use this option to override the normal search or reporting options for bowtie which are set automatically but it might be useful to allow reads to be trimmed before alignment etc.
bwa <text> : Specify extra parameters to be passed to BWA. These parameters should be quoted to clearly delimit BWA parameters from FastQ Screen parameters. You should not try to use this option to override the normal search or reporting options for BWA which are set automatically but it might be useful to allow reads to be trimmed before alignment etc.
minimap2 <text> : Specify extra parameters to be passed to Minimap2. These parameters should be quoted to clearly delimit BWA parameters from FastQ Screen parameters. You should not try to use this option to override the normal search or reporting options for BWA which are set automatically but it might be useful to allow reads to be trimmed before alignment etc.
conf <path> : Manually specify a location for the configuration.
filter <text> : Produce a FASTQ file containing reads mapping to specified genomes. Pass the argument a string of characters (0, 1, 2, 3, -), in which each character corresponds to a reference genome (in the order the reference genome occurs in the configuration file).
Below gives an explanation of each character.
| Character | Explanation |
|---|---|
| 0 | Read does not map |
| 1 | Read maps uniquely |
| 2 | Read multi-maps |
| 3 | Read maps (one or more times) |
| 4 | Passes filter 0 or filter 1 |
| 5 | Passes filter 0 or filter 2 |
| - | Ignore whether a read maps to this genome |
Consider mapping to three genomes (A, B and C), the string ‘003’ produces a file in which reads do not map to genomes A or B, but map (once or more) to genome C. The string ‘–1’ would generate a file in which reads uniquely map to genome C. Whether reads map to genome A or B would be ignored.
When –filter is used in conjunction with –tag, FASTQ files shall be mapped, tagged and then filtered. If the –tag option is not selected however, the input FASTQ file should have been previously tagged.
-
force : Do not terminate if output files already exist, instead overwrite the files.
-
get_genomes : Download pre-indexed Bowtie2 genomes for a range of commonly studied species and sequences. If used with –bisulfite, Bismark bisulfite Bowtie2 indices will be downloaded instead.
-
help : Print program help and exit.
-
illumina1_3 : Assume that the quality values are in encoded in Illumina v1.3 format. Defaults to Sanger format if this flag is not specified.
-
inverse : Inverts the –filter results i.e. reads that pass the –filter parameter will not pass when –filter –inverse are specified together, and vice versa.
-
nohits : Writes to a file the sequences that did not map to any of the specified genomes. This option is equivalent to specifying –tag –filter 0000 (number of zeros corresponds to the number of genomes screened). By default the whole input file will be mapped, unless overridden by –subset.
-
outdir <text> : Specify a directory in which to save output files. If no directory is specified then output files are saved in the current working directory.
-
pass <int> : Used in conjuction with –filter. By default all genome filters must be passed for a read to pass the –filter option. However, a minimum number of genome filters may be specified that a read needs to pass to be considered to pass the –filter option. (–pass 1 effectively acts as an OR boolean operator for the genome filters.)
-
quiet : Suppress all progress reports on stderr and only report errors.
-
subset <int> : Don’t use the whole sequence file, but create a temporary dataset of this specified number of reads. The dataset created will be of approximately (within a factor of 2) of this size. If the real dataset is smaller than twice the specified size then the whole dataset will be used. Subsets will be taken evenly from throughout the whole original dataset. By Default FastQ Screen runs with this parameter set to 100000. To process an entire dataset however, adjust –subset to 0.
-
tag : Label each FASTQ read header with a tag listing to which genomes the read did, or did not align. The first read in the output FASTQ file will list the full genome names along with a score denoting whether the read did not align (0), aligned uniquely to the specified genome (1), or aligned more than once (2). In subsequent reads the genome names are omitted and only the score is printed, in the same order as the first line.
This option results in the he whole file being processed unless overridden explicitly by the user with the –subset parameter
-
threads <int> : Specify across how many threads bowtie will be allowed to run. Overrides the default value set in the configuration file.
-
top <int>/<int,int> : Don’t use the whole sequence file, but create a temporary dataset of the specified number of reads taken from the top of the original file. It is also possible to specify the number of lines to skip before beginning the selection e.g. –top 100000,5000000 skips the first five million reads and selects the subsequent one hundred thousand reads. While this option is usually faster than comparable –subset operations, it does not prevent biases arising from non-uniform distribution of reads in the original FastQ file. This option should only be used when minimising processing time is of highest priority.
-
version : Print the program version and exit.
Terms of use
FastQ Screen is distributed under a “GNU General Public License”, a copy of which is distributed with the software.
Selected Papers citing FastQ Screen
-
Picornell AC, Echavarria I, Alvarez E, et al.: Breast cancer PAM50 signature: correlation and concordance between RNA-Seq and digital multiplexed gene expression technologies in a triple negative breast cancer series. BMC Genomics. 2019; DOI: 10.1186/s12864-019-5849-0
-
Laufer BI, Hwang H, Vogel Ciernia A et al., Whole genome bisulfite sequencing of Down syndrome brain reveals regional DNA hypermethylation and novel disorder insights. Epigenetics. 2019; 14(7), 672-684; DOI:10.1080/15592294.2019.1609867
-
Chana-Muñoz A, Jendroszek Agnieszka Sønnichsen M, et al.: Origin and diversification of the plasminogen activation system among chordates. BMC evolutionary biology 2019; 19(1); DOI:10.1186/s12862-019-1353-z
-
Dawidowska M, Jaksik Roman, Szarzyńska-Zawadzka B, el al.: Comprehensive Investigation of miRNome Identifies Novel Candidate miRNA-mRNA Interactions Implicated in T-Cell Acute Lymphoblastic Leukemia. Neoplasia. 2019; 21(3), 294—310; DOI:10.1016/j.neo.2019.01.004
-
Woodham EF, Paul NR, Tyrrell B, et al.: Coordination by Cdc42 of Actin, Contractility, and Adhesion for Melanoblast Movement in Mouse Skin. Curr Biol. 2017; 27(5): 624–637
-
Perrin S, Firmo C, Lemoine S, et al.: Aozan: an automated post-sequencing data-processing pipeline. Bioinformatics. 2017; 33(14): 2212–2213.
-
O’Sullivan NJ, Teasdale MD, Mattiangeli V, et al.: A whole mitochondria analysis of the Tyrolean Iceman’s leather provides insights into the animal sources of Copper Age clothing. Sci Rep. 2016; 6: 31279.
-
Ewels P, Magnusson M, Lundin S, et al.: MultiQC: summarize analysis results for multiple tools and samples in a single report. Bioinformatics. 2016; 32(19): 3047–3048.
-
Fiddyment S, Holsinger B, Ruzzier C, et al.: Animal origin of 13th-century uterine vellum revealed using noninvasive peptide fingerprinting. Proc Natl Acad Sci U S A. 2015; 112(49): 15066–15071.
-
Rose G, Wooldridge DJ, Anscombe C, et al.: Challenges of the Unknown: Clinical Application of Microbial Metagenomics. Int J Genomics. 2015; 2015: 292950.
Feedback
Bug reports, queries or suggestions can be made via the FastQ Screen GitHub page.